Home > AARs > Chuck Soukup > [CB-7172] > 1941-10-08 (2)
As expected, I caused my opponent some major problems, but he strike back to show me he is not completely without resources to fight back. Overall, this was a pretty good turn for the Axis forces.
Please click on the pictures for a synopsis for each sector.
1) Velikiye Luki and North – Still an inactive sector. No changes, and willing to keep it that way. This is tying up 18-20 Russian divisions, so worth the effort.

2) Rzhev Sector – The scene of a small Russian victory. The Blue X indicated the spot previously occupied by the Panzer Grenadier regiment from the 1st PZ division. My opponent barraged it and then attacked and destroyed it, using (likely) some paratroopers as the lead unit. Total cost to him was at least 2SP and 1 step of 4AR infantry, gaining him bragging rights with Stalin. Was it worth it? Well, possibly, as those units are hard for me to rebuild and it did blunt my move somewhat.
Symbology Key –
Blue Oval – North – 1st PZ
Blue Oval – Center – 14th Mtr
Blue Oval – South – 7th PZ
Blue Star – Truck extender
Blue Triangles – Present positions of HQs
Green Checkmarks – Russian trainbusting hexes
Blue Arrows – Likely moves PZ divisions next turn
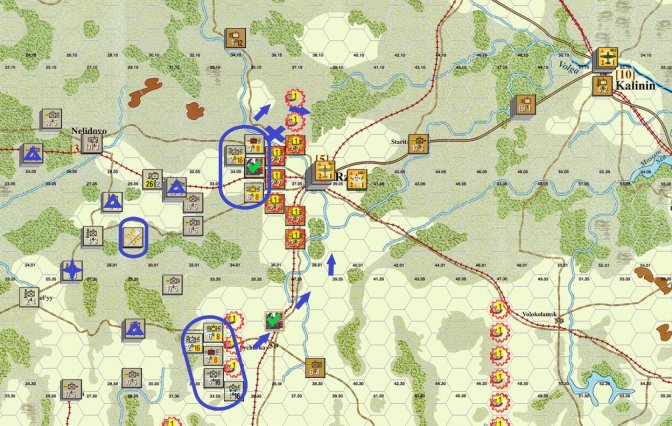
It looks like a stand will be made at Rzhev. Since my opponent pulled back from Vyazma (see next picture), 7th PZ will be committed to taking the city. If only those pesky Russians would just get out to of the way! The trainbusting hexes are placed to cause me maximum heartburn.
3) Vyazma Sector – My opponent lost 12-16 steps here between breakout failures and attrition. Overall, his breakout percentages were poor, but the low numbers he rolled worked well for attrition. Not going to trap as many this turn, but I want Vyazma and the airfield as soon as possible.
Map Key –
Partial Blue Oval – 7th PZ
Blue Oval – South – 10th and 11th PZ
Blue Oval – West – 6th PZ and 36th Mtr. 36th Mtr is fueled already
Blue Triangle – HQ in combat mode
Red X – OOS Tank Brigade who is targeted to perish via overrun as soon as the turn starts.
Blue Arrows – Lines of advance to invest Vyazma

Did pretty well cutting off his units and a good amount died. Once I secure Vyazma, I can plan to possibly pierce the hogline in front of Moscow. My opponent is starting to man the line now, and I don’t expect it to be easy.
4) Bryansk Sector – This sector was a disaster for my opponent. I estimate he lost 25-30 steps between failed breakouts and attrition. He still has 10-15 steps left, but most are already OOS, and few, if any decent AR units to roll attrition with.
Map Key –
Blue Oval – NE – 2nd PZ
Blue Oval – SE of Bryansk – 1st Cavalry Division
Blue Oval – NW of Bryansk – SS-R, fueled
Blue Start – Truck extender
Blue Triangles – HQ’s
Small Blue Arrows – Planned moves to invest Bryans
Large Blue Arrows – Planned moves of infantry divisions to the front.

I am hoping attrition goes quickly here for the Russians, but if it is more than two turns, I may just put them out of their misery.
5) Orel Sector – Surrounded Orel and DG’d the stack. Only 1 step died of attrition. The wait begins, so time to move the rest of my army.
Map Key -
Blue Ovals – from E to W – 3rd and 4th PZ, 18th PZ, 17th PZ and 29th Mtr
Blue Star – Truck Extender
Blue Triangles – HQ’s
Blue Line – Railroad that should be repaired within the next 2 turns
I really have no desire to attack Orel as the cost in both supply and manpower would be fairly high. I will have to plan for it though, just in case. I need more infantry down here!

6) Kharkov Sector – As expected, this sector is becoming a bit of a slog. My opponent has decided to make a stand in both Kharkov and Belgorod, so I have my work cut out for me. I was able to kill about 10-12 steps due to breakout failures and attrition of the units I caught out in the open south of Kharkov.
Map Key –
Blue Oval – under the Reserve marker – 25th Mtr
Other Blue Ovals – from N-S – 10th Mtr, 9th PZ, 16th Mtr, 60th Mtr
Blue Star – Wagon extender
Blue Triangles – HQs
Small Blue Arrows – Infantry lines of movement
Large Blue Arrows – mobile division lines of movement

I’ve decided to use the mobile divisions to threaten Belgorod while the bulk of my infantry will attempt to cut off Kharkov. I will probably cut the rail lines, but my opponent will still have a secondary road out of the city to the East. Oh, and supply is a problem.
7) Dnepropetrovsk and South Sector – Nothing in front of me, but no way to follow up until I get railroads repaired. Russians lost 4 steps lost due to attrition. I have decided to take Lozovaya, because I can 12 Killing strat mode units is kind of fun.
Map Key –
Blue Ovals – from N-S – 14th PZ, 13th PZ, 16th PZ, It D’Aosta Cav Div, SS-W, LAH
Blue Triangles - HQs
Red Circle – Lazovaya

8) Crimea Sector – The Russians facing me at the hog line have disappeared once I cut supply. Attrition accounted for 6 steps. As always, logistics limits my freedom of movement. I do what I can.
Map Key –
Blue Triangle – my one and only HQ
Blue Circle – limit of throw range of my HQ.

Overall, not a bad turn, and I think that my decision to go first was correct. I also believe this is pretty much the last of the “big” pockets for me. My total losses have been pretty minor, but it will still take a while to make them up. Oh, and then we have winter. I can’t wait.
Final accounting for turn three:
My step losses – 3 mech
My opponents step losses –
Combat – 8 inf, 1 mech
Breakout losses – 18-22 inf, 4-6 mech
Attrition Losses – 20-24 inf, 3-7 mech
Russian Turn Total –
46-54 inf, 8-14 mech steps. Midrange = 50 inf, 11 mech
10-12 inf steps and 4-6 mech steps successfully broke out and so I will see them again within 6 turns.
For turn 4, no mud, limited flight, and I lost initiative. My opponent wants to keep the hammer, so I go first. Until next time!