Home > AARs > Chuck Soukup > [CB-7172] > 1941-10-08 (1)
I won the initiative and decided to take a double turn at this point for two reasons. #1 I still want to trap as many Russians as possible behind my lines and this makes it easier, and #2 is that mud can show up next turn. I want to be as far forward as possible before that happens.
My replacement roll was a bit above average (9-1=8) so I got an EQ replacement. My supply roll was an 11! I’ll take that any day, and comes at the right time.
Please click on the pictures for a synopsis for each sector.
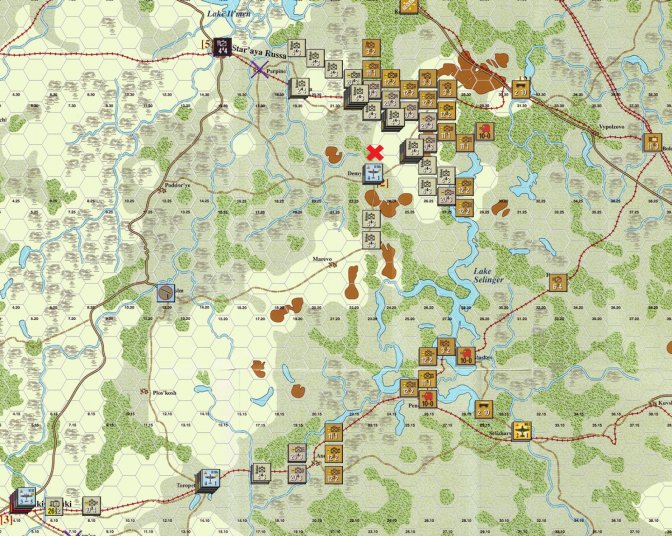
1) Velikiye Luki and North – Still an inactive sector. Some excitement though! The red X marks the sighting of a European Sparrow! Kind of late in the year for this, so a real prize! One of the birdwatchers mistook it of an African Sparrow. That person has since been “dispatched”. In actual war news, I did move the SS-T division from this sector to south of Smolensk. In its place I have reinforced the area with two infantry divisions. Motorized units really not very useful here and better used to the south.
2) Rzhev Sector – Lots of possibilities here and tried to set up my forces to take advantage of whatever my opponent decides to do. First, a key of what you are looking at.
Red Circle – West – Rzhev
Red Circle – way NW – Kalanin – the big prize here
Blue Oval – North– 1st PZ
Blue Oval – South – 7th PZ
Orange Circle – 14th Mtr
Blue Circle – RR Repair unit, eventually heading to Nelidovo and beyond
Blue Checkmark – Truck extender
Blue Triangles – HQs currently in combat mode
Red Arrow – Railroad to Vyazma. From where the arrow sits, Vyazma is 5 hexes away, all open terrain.
Blue Arrows – Possible moves by my PZ divisions
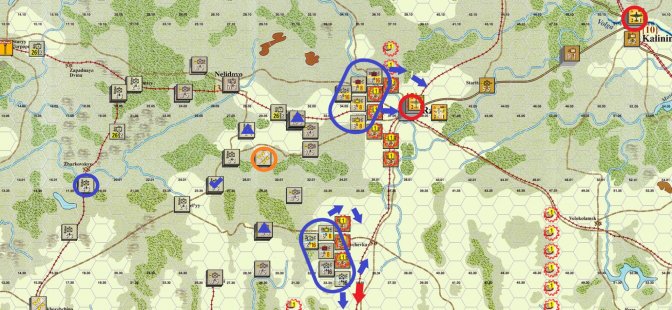
In addition to the circled units there are also 9 infantry divisions moving up. The northernmost ones will be able to engage the hogs west of Rzhev next turn. The Panzer Grenadier regiment from 1st PZ is across the river, which is where he will stay. I attempted to DG the unit in the northernmost occupied Rzhev hog, but was unsuccessful and decided to not attack (odds just not too favorable and rather not lose the regiment).
If my opponent decides to make a stand around Rzhev, he will likely cause me some trouble. The hogline to the south is in real danger, and I expect him to abandon the position. I will decide what to do with 7th PZ based on what he does.
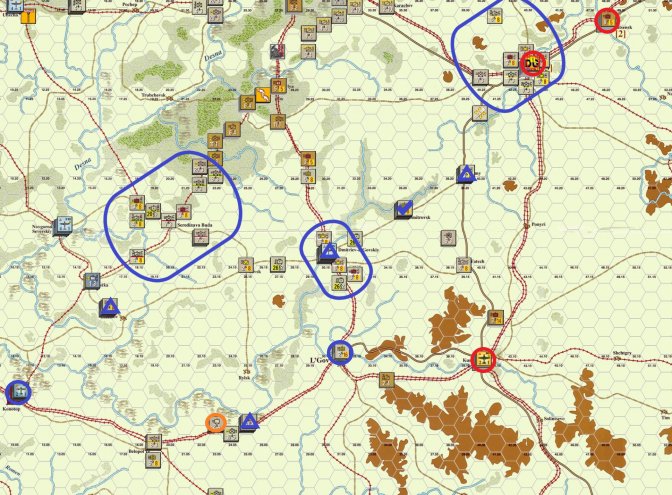
3) Vyazma Sector – This situation turned out much better than I envisioned. I think my opponent is in real trouble here and could lose a large number of steps.
Map Key –
Red Circle – West – Vyazma
Red Circle – East – Borodino
Partial Blue Oval – 7th PZ
Blue Oval – 10th and 11th PZ
Blue Triangle – HQ in combat mode
Green Checkmark – Trainbusted hex, something I seldom use but should
Red X’s – Cut off Russian units (estimate 6-8 steps)
Blue Arrows – Possible lines of advance for my units next turn
Big Blue Arrow – Where I really want to go
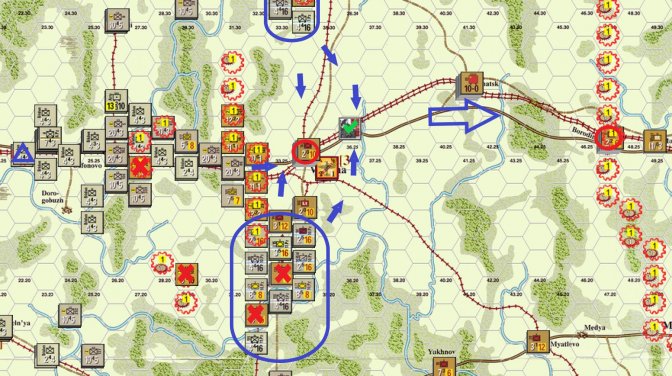
I estimate my moves this turn put about 20-24 steps in mortal danger. If he decides to hold the hogline, I will likely cut it off next turn. If he decides to run, I will likely catch his units out in the open. If he decides to make Vyazma a fortress, again I will likely cut the city off, but he could probably hold off for some time there. The trainbusting hex I created will slow him down somewhat.
My biggest problem right now is supply (isn’t that a shock?). With my limited number of RR repair units, I am really hard pressed to keep trace to my forward elements. I have decided to move the RR repair unit heading toward Spas Demyansk to the Smolensk-Moscow double rail line next turn to get everything pushed further east.
Also, my opponent must now give some serious though to manning the Moscow hog line. I think he is running short on units at the moment (that won’t last forever) and is in a real quandary.
4) Bryansk Sector – I think my opponent waited too long to evacuate. I have a very loose pocket of (I’m estimating here) 30 Infantry and 10 mech steps. I really don’t think he has a praryer of opening up the rail line this turn either.
Map Key –
Blue Circle - North – Spas Demyansk
Blue Circle – NW – Roslav
Orel is just off map to the SE
Blue Oval – NE – 2nd PZ
Blue Oval – West of Bryansk – 8 infantry divisions
Blue Oval – South – 29th Mtr
Blue Oval – SE of Bryansk – 1st Cavalry Division
Blue Checkmark – Truck extender
Blue Triangles – HQ’s in combat mode (have to move some of them and put them somewhere useful)
Green Checkmark – Trainbusting hex
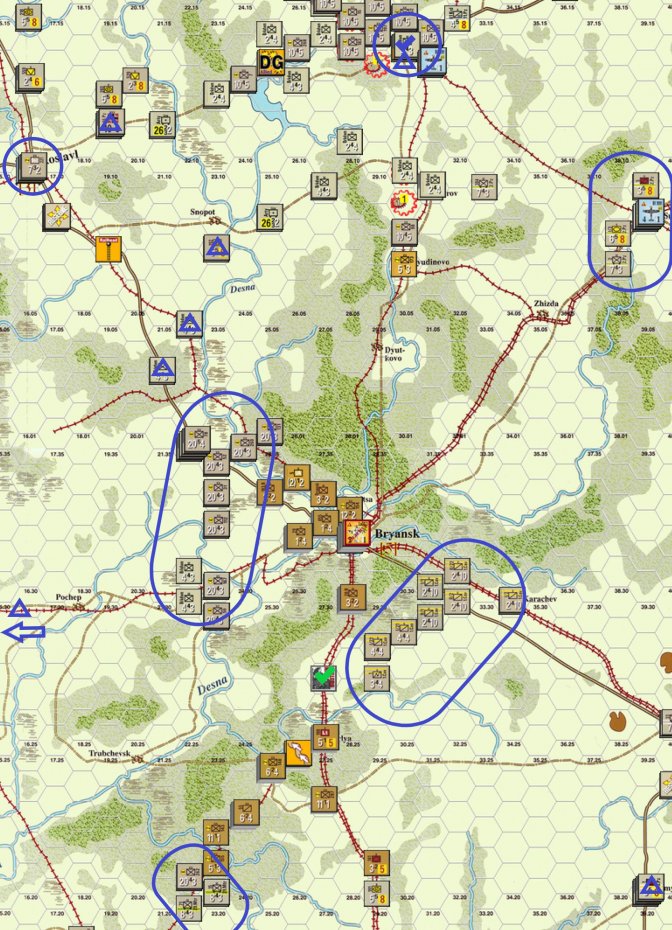
As you can see, no blue arrows showing my next turn moves. I would much rather starve out Bryansk than assault it, but can’t wait forever either. I will see what my opponent does next turn and evaluate.
I don’t think the Russians have a prayer of getting out of there and expect most of them to try a breakout. The purpose of the trendbusting we to break up the pocked and keep the units from the south from getting to Bryansk
5) Orel Sector – Surrounded Orel and DG’d the stack. I know there is an HQ there and 5-6 RE.
Map Key -
Red Circles – from N to S – Mtsensk, Orel, Kursk
Blue Circles – from E to W – L’Gov, Konotop
Blue Ovals – from E to W – 3rd and 4th PZ, 18th PZ, 17th PZ and 29th Mtr
Orange Circle – present position of RR Repair unit
Blue Checkmark – Truck Extender
Blue Triangles – HQ’s in combat mode
Like Bryansk, I would prefer that Orel just starve quickly. Since that will probably not happen, I will have to plan to assault the city. To make it worse, I will then probably have to do the same thing at Mtsensk. I’m really curious to see what my opponent plans to do around Kursk.
As always, lots of mobile units, no gas to move them. What makes this area even worse is I really don’t have much infantry either. I’ll just have to keep importing it one division at a time.
6) Kharkov Sector – this is coming along, but will be slow and cost lots of supply. I think I trapped about 10-12 steps of infantry and a couple of steps of mech, so things are looking up.
Map Key –
Blue Oval – under the Reserve – 25th Mtr
Other Blue Ovals – from N-S – 9th PZ, 16th Mtr, 60th Mtr
Blue Checkmark – Wagon extender
Blue Triangles – HQs in combat mode
Orange Triangle – HQ in move mode
Red X’s – Intermediate objectives to cut off Kharkov

The infantry is getting into position to take the intermediate objectives, and since the Germans move faster than the Russians, I was able to trap some of them in the open. I blocked the river crossings and don’t think he can get trace unless he attacks me.
I will be able to move over the minor river south of Kharkov next turn due to the HQ I placed next to it. This will give me two axes of attack next turn.
As always, the supply situation is marginal, but I was able to get the rail line repaired to Poltave, so it is now a reinforcement hex. Always helpful to have these spots closer to the line.
I did spend an SP to get 9th PZ on the move. With it sitting in a position to go for either Belgorod or Kharkov, hopefully it will give my opponent another headache.
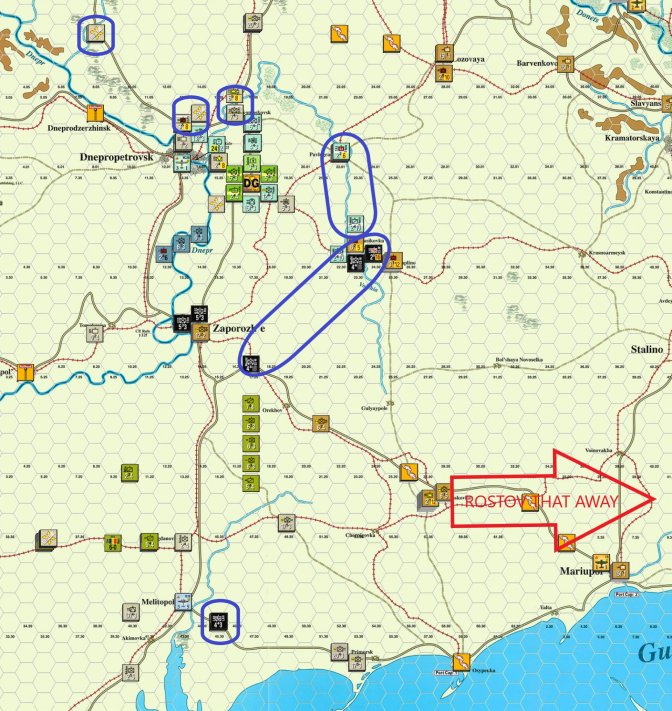
7) Dnepropetrovsk and South Sector – Lots of miscellaneous units, all of which are pretty much at the end of the supply line. Until I start repairing railroads down here, this is pretty much as far as they go.
Map Key –
Blue Ovals – from N-S – 14th PZ, 13th PZ, 16th PZ, It D’Aosta Cav Div, SS-W, LAH
8) Crimea Sector – The breakthrough of the hogline is complete and my opponent will likely try to breakout 4 divisions, leaving me a clear shot south. Unfortunately, the limit of my advance is determined by the railroads, and that means that until I get a RR repair unit down here, I can’t get next to Sevastopol. Plus, you know, supply.
Map Key –
Blue Triangle – my one and only HQ
Green Checkmark – Trainbusting hex
Blue Arrows – optimistic plan for movement.
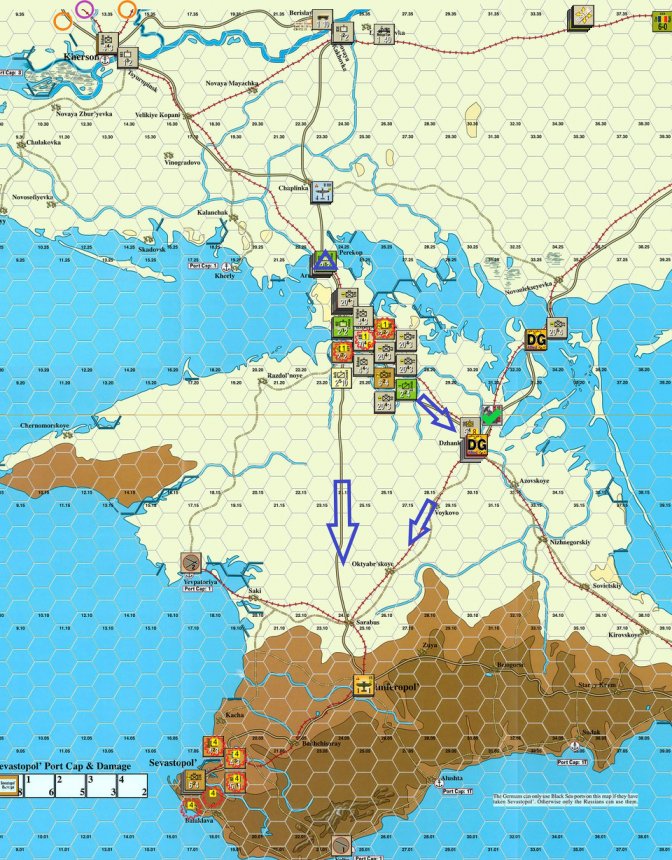
Taking the double turn worked out well. If the weather does turn to mud next turn, I at least got my army in position to attack in spots. Now awaiting my opponents move.